Azure Back to School 2020 - Using Blazor and Azure Static Web Apps to build seamlessly client-side apps

This post is meant to provide you guidance on how to create your client-side applications, using Blazor WebAssembly and Azure Static Web Apps.
To support this post, I decided to record a video with all the steps on how to create your apps, so you can refer to the video and check the steps I am doing.
Prerequisites
In order to follow this guide, you need the following:
- Azure account and subscription
- GitHub account
- Visual Studio / Visual Studio (VS) Code
- Azure Static Web Apps extension for VS Code - In case you are using VS Code
- Install Blazor and create a WebAssembly app
Create Azure Static Web App
Once you created your Blazor WebAssembly app locally, ran it successfully and upload the source files to your GitHub repository, you are good to proceed and create your Azure Static Web Apps using the Azure Portal.
Follows the steps you need to perform using Azure Portal
- Access the Azure Portal
- Create new resource and search for Static Web Apps
- Fill in the form by specifying details such as subscription to use, resource group, app name, region, etc.
- Once you reach the Source Control Details, you need to login to your GitHub account and select the repository and branch where you have your Blazor app committed.
- In the Build Details you need to provide details of the type and structure of your application, so then Azure will configure the GitHub Actions workflow properly to deploy your app into the Static Web App that you are creating. In this demo, you need to configure the app as a Blazor App, and specify the app location as the root of your repository, since you committed your app to the root of your GitHub repository. Please refer to the image below.
- Review and create the Static Web App
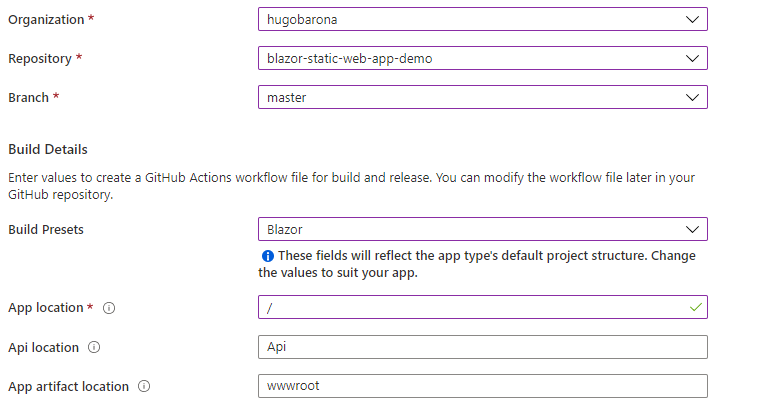
figure 1 Static Web App Creation Form - Build Details
Once you create your Static Web App, Azure will configure automatically your GitHub Actions workflow, and will create an yaml file with all the configurations of the new workflow that will deploy your app to the Static Web App that you created. You should be able to go back to your GitHub repository, and under the Actions menu option, you should have the history of the workflow executions, including the execution related to the creation of your Static Web App. If you open that given execution, you should have all jobs green and showing that the execution was succeeded. Also, in the logs of your Build and Deploy job, you have the URL for the Static Web App, so you can use it to check your Blazor App running there.
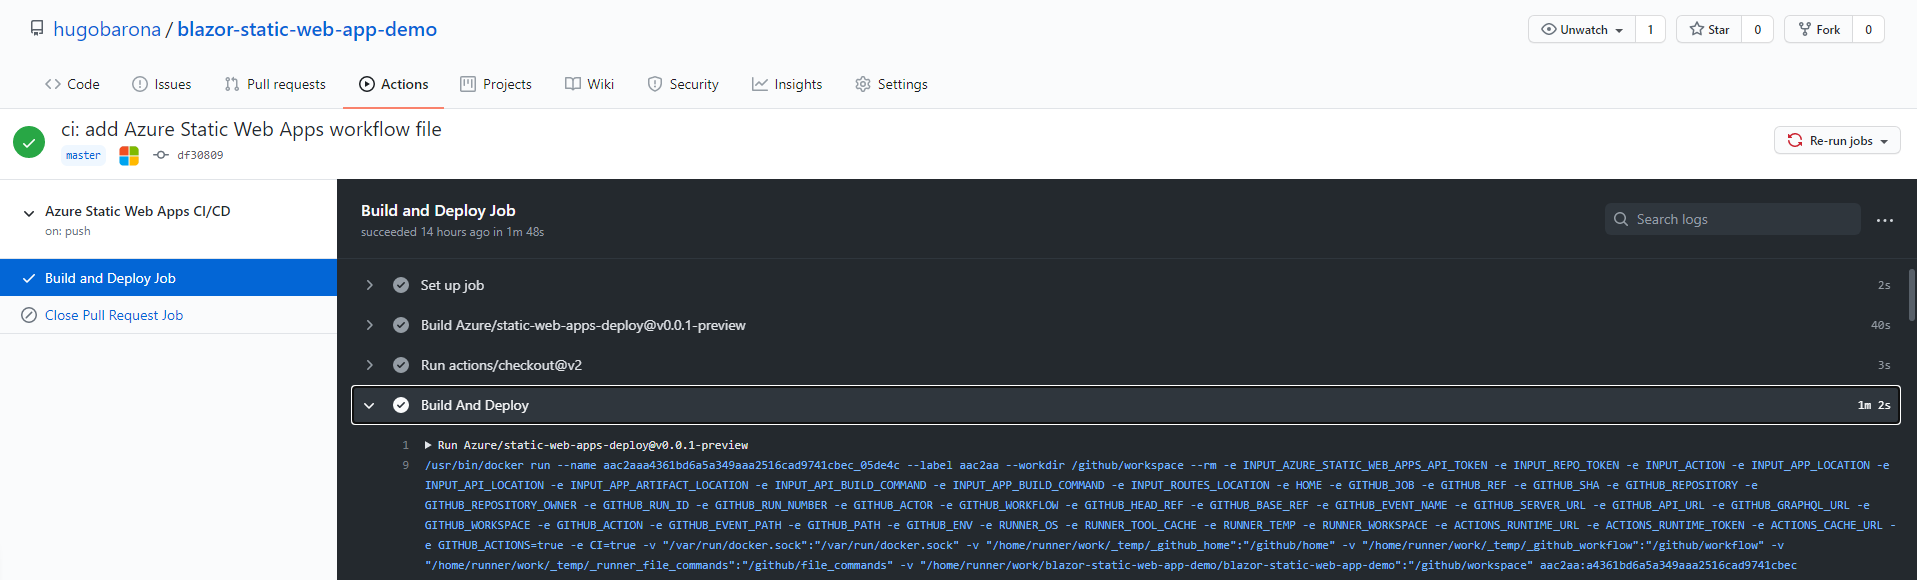
figure 2 GitHub Actions - Workflow History
Run and configure the GitHub actions workflow
Now, you have your Blazor app running inside your Static Web App. So, you can now modify and test your Blazor app locally, and commit your changes. Once you commit your changes, the workflow runs again and deploys your changes to the Static Web App. Once the workflow finishes, you should be able to check your new changes using the static web app’s url.

Wrap-up
This post is a short description of the quick steps you can perform to start creating your Blazor apps and host them using the Azure Static Web Apps. In case you want to get more details about the steps, you can always refer to the video I produced, showing all the details on how to create your apps seamlessly. \
In case you want to take your app to the next level, please have a look to the resources I include in the list below, where I mention a few open-source community projects that provide libraries to allow you to easily create custom and pretty components in your app, using CSS frameworks such as Bootstrap, AntDesign and Material - Blazorise. Also, you can improve the quality of your code and easily implement unit tests in your application by leveraging the bUnit testing libraries available.
Last but not least, if you want to keep updated about all features and capabilities available on Blazor WebAssembly, version 3.2.0, then have a look to this great article - Blazor WebAssembly 3.2.0 now available.
Resources
Please have a look to the relevant resources discussed in this post.
| Resource |
|---|
| Blazor WebAssembly 3.2.0 now available |
| Blazorise |
| bUnit |